When it comes to the automotive industry, the installation of auto upper body parts is a critical process that requires precision, knowledge, and the right tools. As a leading supplier of Auto Upper Body Parts, I'm here to guide you through the step - by - step process of installing these parts, ensuring a smooth and efficient operation.
Understanding Auto Upper Body Parts
Before diving into the installation process, it's essential to have a clear understanding of what auto upper body parts are. These parts typically include components such as fenders, hoods, doors, and roof panels. They not only contribute to the aesthetic appeal of the vehicle but also play a crucial role in protecting the vehicle's interior and passengers.
Our company offers a wide range of high - quality auto upper body parts, which are designed to meet the strictest industry standards. Whether you're a professional mechanic or a DIY enthusiast, our parts are engineered for easy installation and long - lasting performance.
Pre - installation Preparations
- Gather the Necessary Tools: You'll need a variety of tools for the installation, including wrenches, screwdrivers, pliers, and a socket set. Make sure all your tools are in good condition and properly sized for the job.
- Inspect the Parts: Before installation, carefully inspect the auto upper body parts for any damage or defects. Check for dents, scratches, or misalignments. If you notice any issues, contact our customer service team immediately.
- Prepare the Workspace: Clear the area where you'll be working. Ensure that the workspace is clean, well - lit, and free from any obstacles. This will help prevent accidents and make the installation process more efficient.
Step - by - Step Installation Process
Installing Fenders
- Remove the Old Fender: Start by removing the bolts and screws that hold the old fender in place. Use a socket set or a wrench to loosen and remove them. Carefully lift the old fender off the vehicle and set it aside.
- Position the New Fender: Align the new fender with the mounting points on the vehicle. Make sure it fits snugly and is properly aligned with the other body parts.
- Secure the Fender: Insert the bolts and screws through the mounting holes in the fender and tighten them using the appropriate tools. Be careful not to over - tighten, as this can cause damage to the fender or the vehicle's body.
Installing Hoods
- Remove the Old Hood: Locate the hinges that connect the hood to the vehicle. Remove the bolts or pins that hold the hinges in place. Lift the old hood off the vehicle and place it on a safe surface.
- Prepare the New Hood: Check the new hood for any adjustments that may be needed. Some hoods may require minor trimming or bending to fit properly.
- Attach the New Hood: Align the new hood with the hinges on the vehicle. Insert the bolts or pins through the hinge holes and secure them tightly. Make sure the hood opens and closes smoothly.
Installing Doors
- Remove the Old Door: Remove the door hinges by loosening the bolts or pins. Carefully lift the old door off the vehicle and set it aside.
- Inspect the Door Frame: Check the door frame for any damage or debris. Clean the frame and ensure that the weatherstripping is in good condition.
- Install the New Door: Align the new door with the door frame and the hinges. Insert the bolts or pins through the hinge holes and tighten them. Test the door to make sure it opens and closes properly and latches securely.
Installing Roof Panels
- Remove the Old Roof Panel: If applicable, remove any interior trim or headliner that covers the roof panel. Locate the bolts or clips that hold the roof panel in place and remove them. Carefully lift the old roof panel off the vehicle.
- Prepare the New Roof Panel: Check the new roof panel for any defects or misalignments. Some roof panels may need to be primed or painted before installation.
- Install the New Roof Panel: Align the new roof panel with the mounting points on the vehicle. Secure it using the bolts or clips. Reinstall the interior trim and headliner.
Using Quality Tooling for Installation
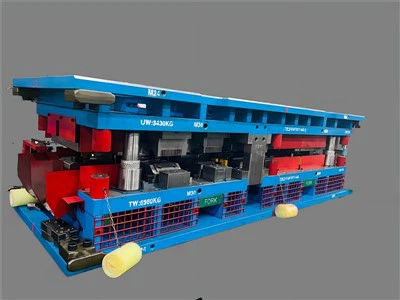
To ensure a high - quality installation, it's important to use the right tooling. Our company recommends using products like Sheet Metal Progressive Tool, Sheet Metal Stamping Dies, and single casting die. These tools are designed to provide precise and efficient results, reducing the risk of errors during the installation process.
Post - installation Checks
- Check the Alignment: After installing all the auto upper body parts, check the alignment of the parts. Make sure they are flush with each other and with the rest of the vehicle's body.
- Test the Functionality: Test the functionality of the installed parts. Open and close the doors, hood, and trunk. Check that the windows roll up and down smoothly.
- Inspect for Leaks: Check for any signs of leaks around the installed parts. This is especially important for the roof panel and doors. If you notice any leaks, make the necessary adjustments or contact our technical support team.
Why Choose Our Auto Upper Body Parts
- Quality Assurance: Our parts are manufactured using high - quality materials and advanced manufacturing processes. We conduct rigorous quality control checks to ensure that each part meets our strict standards.
- Wide Selection: We offer a comprehensive range of auto upper body parts to fit various makes and models of vehicles. Whether you need a fender for a compact car or a hood for a luxury SUV, we have you covered.
- Expert Support: Our team of experts is available to provide you with technical support and advice. If you have any questions during the installation process, don't hesitate to reach out to us.
Contact Us for Purchasing and Consultation
If you're interested in purchasing our auto upper body parts or have any questions about the installation process, we encourage you to contact us. Our sales team is ready to assist you with your procurement needs and provide you with detailed product information. Whether you're a large automotive repair shop or an individual car owner, we can offer you the right solutions at competitive prices. Start a conversation with us today and experience the difference of working with a reliable auto upper body parts supplier.


References
- Automotive Body Repair Manuals
- Industry - specific Technical Journals
- Manufacturer's Installation Guides