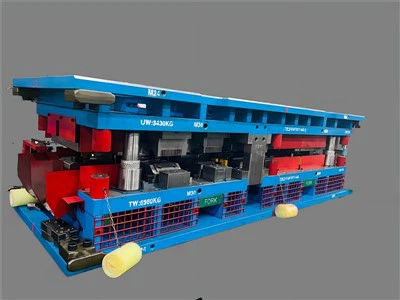
Hey there! As a supplier of Tandem Die, I'm super excited to walk you through the installation process of a tandem die. It's a pretty cool piece of equipment that can really up your game in the stamping industry. So, let's dive right in!
What's a Tandem Die Anyway?
Before we get into the installation, let's quickly talk about what a Tandem Die is. A Tandem Die is a specialized stamping die that allows for multiple operations to be performed in a single pass through a press. It's like having a mini factory on your stamping press. This type of die is commonly used in the manufacturing of home appliances, automotive parts, and more. You can learn more about Tandem Die on our website Tandem Die.
Pre - installation Checks
The first step in the installation process is to do a bunch of pre - installation checks. These checks are crucial to ensure that the installation goes smoothly and that the die works correctly once it's up and running.
Press Compatibility
First off, you need to make sure that your press is compatible with the tandem die. Check the press's tonnage capacity, stroke length, and bed size. The tonnage capacity should be sufficient to handle the force required to operate the die. If the press is too weak, it won't be able to form the parts properly, and it might even get damaged. The stroke length should be long enough to allow the die to open and close fully, and the bed size should be large enough to accommodate the die.
Die Inspection
Take a good look at the tandem die itself. Check for any visible damage, such as cracks, chips, or bent parts. Make sure all the components are in place and that the die is clean. Any debris or dirt on the die can cause problems during the stamping process. If you notice any issues, contact us right away, and we'll help you sort it out.
Tooling and Accessories
Gather all the necessary tooling and accessories for the installation. This includes things like bolts, nuts, wrenches, and hoists. Having everything ready before you start the installation will save you a lot of time and hassle.
Installation Steps
Positioning the Die
The first step in the actual installation is to position the tandem die on the press bed. Use a hoist to carefully lift the die and place it on the press bed. Make sure it's centered and aligned properly. You can use alignment pins or guides on the press bed to help with this. Once the die is in position, lower it gently onto the press bed.
Securing the Die
After positioning the die, it's time to secure it to the press bed. Use bolts and nuts to fasten the die to the press bed. Make sure the bolts are tightened evenly to prevent the die from shifting during operation. This is really important because if the die moves, it can cause misaligned parts and damage to the die and the press.
Connecting the Die Components
Now, you need to connect all the components of the tandem die. This includes connecting the upper and lower die halves, as well as any auxiliary components like strippers and ejectors. Follow the manufacturer's instructions carefully when making these connections. Make sure all the connections are tight and secure.


Adjusting the Die
Once the die is connected, you need to adjust it for proper operation. This involves setting the clearance between the upper and lower die halves, as well as adjusting the stroke length and other parameters. Use a feeler gauge to measure the clearance and make any necessary adjustments. You might also need to adjust the pressure settings on the press to ensure that the die operates smoothly.
Testing the Die
After adjusting the die, it's time to test it. Run a few test cycles on the press with the die installed. Check the quality of the stamped parts. Look for any signs of misalignment, burrs, or other defects. If you notice any problems, stop the press immediately and make the necessary adjustments.
Post - installation Considerations
Training
Once the tandem die is installed and tested, it's important to train your operators on how to use it properly. Provide them with training on the die's operation, maintenance, and safety procedures. This will help ensure that the die is used correctly and that it lasts for a long time.
Maintenance
Regular maintenance is crucial for the longevity of the tandem die. Set up a maintenance schedule and follow it religiously. This includes things like cleaning the die, lubricating the moving parts, and inspecting the die for wear and tear. If you need any replacement parts or maintenance services, we're here to help.
Related Products
If you're in the home appliance manufacturing industry, you might also be interested in our Gas Stove Die and Microwave Oven Die. These dies are designed to meet the specific needs of home appliance manufacturers and can help you produce high - quality parts efficiently.
Conclusion
Well, that's the installation process of a tandem die in a nutshell. It might seem a bit complicated at first, but with the right preparation and following the steps carefully, you can have your tandem die up and running in no time. If you have any questions or need further assistance with the installation, don't hesitate to reach out to us. We're always here to help you get the most out of your tandem die.
Whether you're a small - scale manufacturer or a large - scale industrial giant, our tandem dies can make a big difference in your production process. So, if you're interested in purchasing a tandem die or any of our other products, let's start a conversation. We're eager to discuss your specific needs and find the perfect solution for you. Contact us today to get the ball rolling on your next project!
References
- Stamping Die Handbook, Industry Press, 2020
- Home Appliance Manufacturing Guide, Manufacturing Insights Inc., 2021